192.168.0.254 is the default IP address that allows you to set up Rockspace extender effortlessly. Users may still face issues while getting to the default IP address and come across any error message saying ‘this site can’t be reached’.
The error message might vary according to the internet browser you are utilizing. Assuming you are also among the people who are battling with the 192.168.0.254 IP not working issue, don’t bother stressing! Here, we have mentioned every possible tip utilizing which you can access the Rockspace default IP with out any problem. Read on further to verify if you are using the correct steps to access the IP address or not.
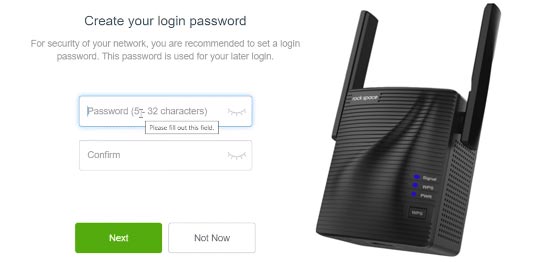
Follow the step-by-step instructions given below to get to the login page of your extender utilizing the Rockspace default IP, i.e., 192.168.0.254:
Congrats! You are done with Rockspace WiFi extender login process via 192.168.0.254.
Minor technical glitches are a potential reason for the Rockspace extender 192.168.0.254 IP address not working issue. It is important to restart your extender to fix this errors. To restart your extender, follow these guidelines:
If you’ve used an Ethernet cable to connect the range extender and the host router, check if it’s in working condition or not. On the off chance it is not, replace the cable right away.
Ensure that the extender isn’t placed close to any signal interference causing device or appliance.
Perhaps, you did not use the correct IP address or used the correct one with typos in it. Type the IP address again. This time, make sure that there are no typing errors in it. Also, verify the entrée once before pressing the Enter key.
Another reason why the IP address not working issue continues to trouble you is that your devices are placed too far. Now,bring your devices closer.
Additionally ensure that your devices are not kept neck to neck. Their signals could clash in the case.
Interrupted power supply is another reason for Rockspace extender 192.168.0.254 IP not working issue.
Check the wall socket you are using for any damages On the off chance that it is, either fix it or plug your Rockspace extender into an alternate one.
To fix the Rockspace extender 192.168.0.254 not working issue, reset your device. To reset, all you really need to do is:
Rockspace extender is reset!
Reconfigure your extender via the 192.168.0.254
Disclaimer: re-rockspace-local.net is an independent website that provides information to users on topics like Rockspace devices' setup, login and management. We do not endorse any brand or product. Use of images, trademarks, logos or brand names is only for informational purposes. The information provided on the website must be used at your own discretion.